Always wondered how to get the perfect hard boiled eggs every single time? This is one trick that you’ll love knowing!
Perfect Hard-Boiled Eggs… EVERY TIME!
Like most Paleo people, I eat a TON of eggs! They’re loaded with nutrients, perfect for a quick meal, and delicious when cooked right! I used to wake up at 5AM and be on the road to work by 6AM; hard-boiled eggs were often the most convenient option. And on days when I would be half asleep, going out the door, and leaving my lunch behind… 🙁 … hard boiled eggs were the healthiest option in the corporate cafeteria. For the longest time, sometimes my eggs would get that green ring around the yolk and sometimes they wouldn’t. Even the ones I would buy at work would often have the green hue.
When eggs are overcooked, the greenish hue occurs as a result of the reaction between the sulfur and iron compounds in the egg. The eggs are still edible. I have heard people say that the taste is unaffected. I absolutely disagree. If you have ever had a perfectly hard-boiled egg, then you know that an overcooked egg tastes pretty bad. Plus, it smells terrible! Poor eggs have a bad rep for their smell, all because they are constantly being overcooked. Perfectly hard-boiled eggs are odorless! This is especially important if you plan to eat them at the office or on an airplane.
Since I often eat them at work, I really don’t want my eggs to be smelly. So, I researched and I researched. I tried every method… boil them for this long, use this temperature water, etc. etc. Sometimes it worked, sometimes it didn’t. I finally found a method that works perfectly… EVERY TIME. I learned this method from the famous French chef, Jacque Pepin, not personally (I wish!), I saw him do this on TV.
Fresh eggs tend to be harder to peel, but I have found with this technique they actually peel pretty easily!
How to Make Perfect Hard-Boiled Eggs
Step 1
Bring a pot of water to a light boil (not a rolling boil). Use a pot that is large enough, so your eggs will be in a single layer and will be covered with at least an inch or two of water.
Step 2
Use a thumbtack and place a hole on the larger round side (not pointy side) of each egg. This releases pressure inside of the egg, so the shells won’t crack.
Step 3
Using a spoon, gently lower each egg into the lightly boiling water. Boil the eggs for 10 minutes, making sure that the water is only gently boiling. The water boiling at too high of a temperature is what causes eggs to become tough and rubbery.
Step 4
Empty the water and leave the eggs in the pot. Shake the pot, so the eggs bang together and the shells crack.
Step 5
Cover eggs in cold water. Allow them to sit for 5 minutes, so the eggs can cool.
Step 6
Optional: Peel eggs under running water. This makes them easier to peel.
Step 7
Optional: Slice eggs using an egg slicer. I use this one.
Step 8
Enjoy perfect hard-boiled eggs!
LOOKING FOR MORE FREE RECIPES? Subscribe to my newsletter and follow along on Facebook, Pinterest and Instagram for all of the latest updates.
Perfect Hard-Boiled Eggs
Ingredients
- eggs
- water
Instructions
- Bring a pot of water to a light boil (not a rolling boil). Use a pot that is large enough, so your eggs will be in a single layer and will be covered with at least an inch or two of water.
- Using a spoon, gently lower each egg into the lightly boiling water. Boil the eggs for 10 minutes, making sure that the water is only gently boiling. The water boiling at too high of a temperature is what causes eggs to become tough and rubbery.
- Cover eggs in cold water. Allow them to sit for 5 minutes, so the eggs can cool.
- Optional: Peel eggs under running water. This makes them easier to peel.
Do you eat a lot of eggs? What’s your favorite way to prepare them?


You say whether your eggs start at room temp or still cold? I know it can make a difference at times with different cooking instructions.
Thanks for the tips and insight,
RD
Didn’t say… sorry typing and thinking or not thinking. 🙂
It is better to use room temperature eggs, but I often forget to take them out and use eggs straight out of the fridge and it still works!
If I’m not going to eat the eggs right away, do I just skip Step 4?
You can! But you can also just peel them and save them for later. I think Step 4, helps them peel much easier.
I\\\’m going to try this! I have chickens, so the eggs are very fresh and they never peel properly — I have mostly given up on hard boiled eggs, but I\\\’d love to have them once in a while! Thanks for all you do!
Hi Beth! The method works with the eggs I get from a local farm, but they probably aren\’t quite as fresh as your eggs! So. let us know how it works!
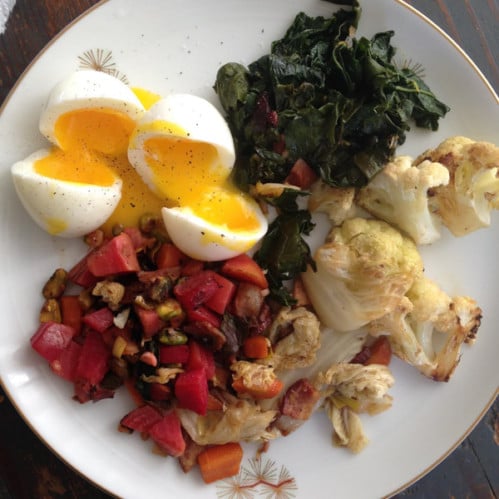
Interesting what we each like. I would NOT eat the eggs in your picture. to me they are not done. I want mine more done in the middle. I cook them slow, but want a couple more minutes.
HI Marguerite! I love runny yolks! But if you like them done more, you can just leave them in the water for a few more minutes.
This truly works every time!!! I have tested so many theories, but this is the only one that is extremely consistent!
That has been my exact experience too!
making these today! (never made hard boiled eggs before) If I peel them, how long will they stay fresh in the fridge?