I am so excited to introduce you to today’s guest blogger, Meghan of Just Enjoy Food! How I met Megan is a bit of a wild coincidence, she’ll tell you more about it below. If you know me personally, then you know that I LOVE coincidences. There is just something about them, it makes me feel like life is on the right track and I am connecting with the right people. Connecting with Meghan has been awesome! We have become fast friends, as we have much in common. I look forward to meeting her in person one day!
Just Enjoy Food is a fantastic resource. Meghan shares healthy and delicious recipes. In addition, she is a chiropractor and a health coach, so she also writes informative posts on health and wellness. Visit Meghan at Just Enjoy Food and connect with her on Facebook and Instagram!
****************
Hello everyone. I’m Dr. Meghan. I’m so honored to be able to be guest posting today on Rubies & Radishes. I’m a chiropractor, that’s my training and that’s technically my job. But being a chiropractor runs so much deeper within me. It started with a love of food back when I was in high school. It started with my family and I becoming passionate about the foods we were putting on our bodies. But then at 18 I got sick. At that time, I had no idea what I was feeling wasn’t normal, although it completely wore my body down physically and mentally. And that put me on a journey.
I am naturally a researcher and I love reading and knowing as much as I can. That journey lead me to be a chiropractor, led me to become a specialist in cellular healing and chronic diseases, and that journey still inspires me today, to seek natural ways to get our bodies healthy. I truly believe, with all of my heart, that is the best way to do it! I started my blog to share my recipes with friends and family. I wanted to make everyday dishes healthy and I knew that eating healthy could taste great! My goal is for my blog posts to be equally delicious as they are informative so you can learn right along side of me.
Although I’ve never met Arsy in person I truly feel like I’ve gotten to know her like we were chatting across the table at a coffee shop. But my connection to Arsy is actually through my husband Phil. They met in 2008 going through the same work training program. It wasn’t until a couple of months ago when we were looking through Instagram, Phil seriously jumped out of his seat exclaiming he knew the writer of Rubies & Radishes. I couldn’t believe it, my husband knew the writer to one of my favorite blogs? After that, the blogger friendship began. I love how we can join around the virtual dinner table and create friendships around healthy food with people in all parts of the world.
This recipe is irresistible! It is a melt in your mouth and savor every bite full kind of dessert. I have to start out saying, it’s not Paleo. Although I do have a completely dairy-free Paleo recipe option that is amazing in it’s own right. I am under the belief that dairy can be good and healing for some people and not beneficial for others. So I want to give both options depending on your dietary needs.
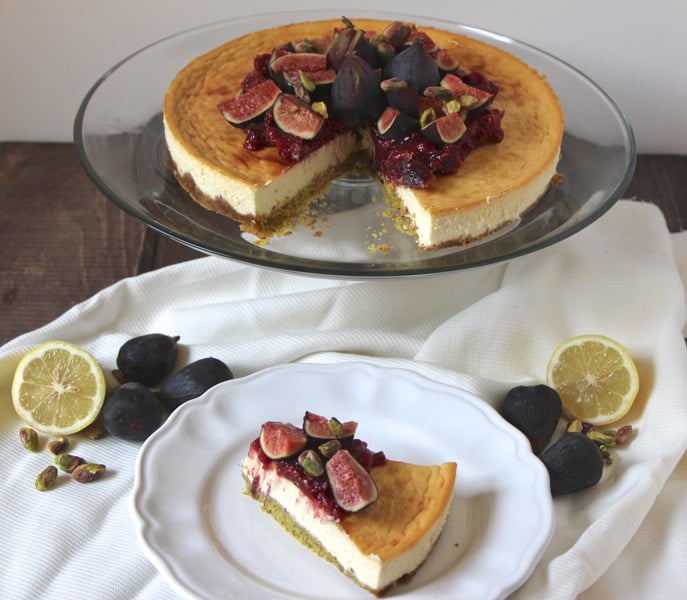
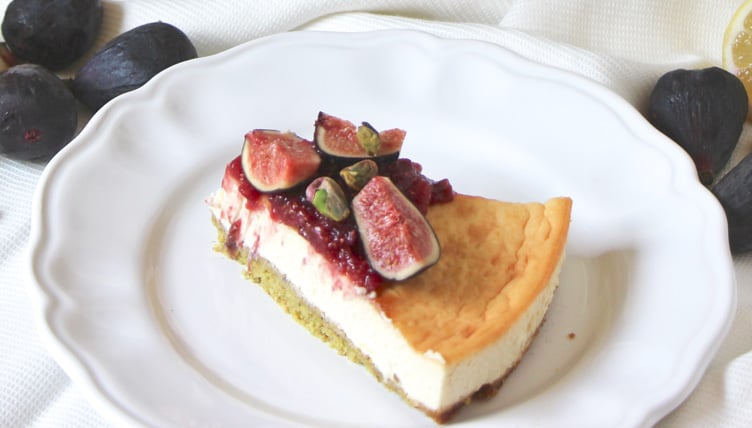
This recipe was inspired by my first bite of a real, fresh fig in August. Now I can’t even believe that I’d never had a fresh fig before that. They were amazing; sweet, savory and had the most interesting texture. I knew that I needed to create a recipe that encompassed figs and cheesecake. I added a few other ingredients too and this recipe quickly became one of my favorites.
Figs are a fruit that are very high in fiber and high in antioxidant levels. The thick outside of the fruit is almost hard to bit into it’s so fibrous. Our bodies have so much stress on them from our daily living (physical and mental stress) that we need antioxidants. Some people need them more than others and may need to supplement. But if you can choose foods with high antioxidant levels on a regular basis you are one step ahead of the game. Antioxidant rich cheesecake, I’ll take that!
There are a few steps to this recipe. Many of my recipes are quick and easy, but there is such joy in spending some extra time in the kitchen creating a delicious dessert you can eat with friends and family. This is one of those recipes. And every minute spent in the kitchen is completely worth it for this dessert.
Before you start this cheesecake you want to make sure to have the fig jam already made. You can find the recipe below. This is a refrigerator jam and can be used in a variety of ways, even eating Paleo. I like it on scones and muffins.
Honey Pistachio Cheesecake with Fig Jam
[Printable Version]
Ingredients
Crust
1 ¾ cup almond flour
½ cup unsalted pistachios, ground
1 teaspoon Stevita stevia (adjust stevia amounts based on the brand used) (find it here)
½ teaspoon salt
6 Tablespoons organic grass-fed butter, melted
Cheesecake
2 8oz blocks organic cream cheese, room temp
1 cup organic sour cream, room temp
4 eggs, room temp
3 teaspoons Stevita stevia
¼ cup raw honey
1 teaspoon lemon zest
Fig Cheesecake Topping
1 cup (REFRIGERATOR FIG JAM LINK)
5-8 fresh figs, quartered
¼ cup pistachios
Directions
For the crust
- Preheat the oven to 350 degrees and take out a 9 inch springform pan
- In a small bowl add the almond flour, ground pistachios, stevia and salt and give them all a quick mix with a spatula
- Add the butter to the flours and mix with the spatula until combined, scraping down the edges of the bowl so it is all uniform
- Add to the springform pan and press the crust down with your hands until it is evenly covering the bottom and pressed firmly into the pan
- Bake for 15 minutes until the edges of the crust are golden brown
- Let the crust cool completely before adding in the cheesecake filling
For the cheesecake
- In a food processor add the cream cheese and sour cream and pulse a few times to start to mix them together
- Add the eggs and turn the food processor on and mix until thoroughly combined and smooth.
- Add the stevia, honey and lemon zest and mix again for 30 seconds until very smooth. I wait to add the honey until the end so it doesn’t stick to the sides of the food processor. You want it blended very well so that the eggs are beaten and they won’t separate during the cooking process
- Pour the filling into the cooled crust. You will cook your cheesecake in a waterbath which ensures even cooking. That way your outside isn’t burnt and your inside isn’t still raw.
- Prepare a water bath for the cheesecake. To do that, cover the outside of the springform pan with about 3 layers of aluminum foil. It keeps the water out of your cheesecake crust. Find a casserole dish that fits the springform pan in it. I have this very old and oversized aluminum baking dish. The only thing it is used for is water baths for cheesecake. Add the springform pan to the empty dish and fill the pan with about 1 inch of water.
- Very carefully put your cheesecake in the oven for 60-70 minutes until the cheesecake is golden color. You will know it is done when you jiggle the springform pan the cheesecake does not move.
- Take out of the oven with great caution because the water bath is very hot. Remove the cheesecake from the water bath and let cool on the counter. Refrigerate for 8-24 hours before serving
- When ready to serve spread 1 cup of refrigerated fig jam in the center of the cheesecacke. Top with quartered figs and sprinkle with whole pistachios
Serves 8-12, depending on how big you cut your pieces
Dairy-Free Cheesecake Option
[Printable Version]
When I was thinking up my dairy-free cheesecake I wanted it to be as close to the “real thing” as I could. I’ve seen so many recipes for no-bake dairy-free cheesecakes, but I haven’t seen a baked dairy-free cheesecake. I wanted this cheesecake to be baked. I know you can use those horribly toxic soy cheese alternatives in a cheesecake, but I am not about to go down that road. You know me better than to use toxic processed soy products. I was so nervous that this recipe wouldn’t turn out, but the results were spectacular. The look and texture of this cheesecake is perfect, nobody would know that it didn’t have cream cheese.
This recipe is based on the same ratios and measurements as the dairy version of my fig cheesecake. I had to tweek a few things when I took the dairy out, but it’s nearly identical.
To make this cheesecake you will first make the dairy-free cream cheese and then make the cheesecake recipe with that.
Ingredients
Crust
2 ¼ cup almond flour
1 teaspoon Stevita stevia (adjust stevia amounts based on the brand used) (find it here)
½ teaspoon salt
8 Tablespoons coconut oil, melted
Dairy-Free Cream Cheese
3 cups raw cashews, sprouted
½ cup coconut butter
1 ½ cup canned coconut milk
3 teaspoon Stevita stevia (find it here)
2 teaspoon vanilla
Cheesecake Filling
3 cups dairy-free cheesecake (it may be about 3 ¼ cup once you are done making it)
4 eggs, room temperature
1 teaspoon Stevita stevia (find it here)
1/3 cup raw honey
1 ½ teaspoon lemon zest
Directions
For the crust
- Preheat the oven to 350 degrees and take out a 9 inch springform pan
- In a small bowl add the almond flour, stevia and salt and give them all a quick mix with a spatula
- Add the melted coconut to the flours and mix with the spatula until combined, scraping down the edges of the bowl so it is all uniform
- Add to the springform pan and press the crust down with your hands until it is evenly covering the bottom and pressed firmly into the pan
- Bake for 15 minutes until the edges of the crust are golden brown
- Let the crust cool completely before adding in the cheesecake filling
For the dairy-free cream cheese
- Soak the cashews overnight in the refrigerator
- Strain the cashews in a colander and add to a high powered blender. Add the remaining cream cheese ingredients; coconut butter, coconut milk, stevia and vanilla
- Blend until smooth. You may need to use the tamper to mix it around. If your blender isn’t as powerful, you can try the food processor or add a little more coconut milk (it will make more cream cheese)
For the cheesecake
- In a food processor add the cream cheese and eggs and turn the food processor on and mix thoroughly.
- Add the stevia, honey and lemon zest and mix again for 30 seconds until very smooth. I wait to add the honey until the end so it doesn’t stick to the sides of the food processor. You want it blended very well so that the eggs are beaten and they won’t separate during the cooking process
- Pour the filling into the cooled crust. You will cook your cheesecake in a waterbath which ensures even cooking. That way your outside isn’t burnt and your inside isn’t still raw.
- Prepare a water bath for the cheesecake. To do that, cover the outside of the springform pan with about 3 layers of aluminum foil. It keeps the water out of your cheesecake crust. Find a casserole dish that fits the springform pan in it. I have this very old and oversized aluminum baking dish. The only thing it is used for is water baths for cheesecake. Add the springform pan to the empty dish and fill the pan with about 1 inch of water.
- Very carefully put your cheesecake in the oven for 40-45 minutes until the cheesecake is golden color. You will know it is done when you jiggle the springform pan the cheesecake does not move.
- Take out of the oven with great caution because the water bath is very hot. Remove the cheesecake from the water bath and let cool on the counter. Refrigerate before serving
- This cheesecake is best when served with a fruit sauce. I like it with mashed strawberries
Serves 8-12, depending on piece size
Refrigerator Fig Jam
Ingredients
6 dozen figs, about 8 cups
4 teaspoon Stevita stevia (find it here)
3 cups water
2 Tablespoons fresh lemon juice
3 Tablespoons raw honey
Directions
- Start by washing all of the figs. You are going to put them in a strainer (you probably need to do two batches) and wash them under cold water
- Remove the stems with a knife or by peeling them off with your fingers
- Quarter each fig and put them in a 6 quart sauce pot
- Add the stevia, water, lemon juice and raw honey to the pot
- Turn the pot on medium-high and using a potato masher, start to breakdown the figs. This is going to take a little while because the outsides of the figs are fibrous. Keep mashing until you can’t see any quartered figs anymore. As this jam cooks they will break down more and more
- Cook on medium-high for 10 minutes stirring regularly to prevent burning
- Turn the heat to low. At this time the jam will be very red. Stir occasionally and simmer for 10 more minutes
- Take clean, sterilized pint sized mason jars and fill with the jam. Let them sit on the counter until warm and then put in the refrigerator. Jam lasts 1-2 months in the refrigerator. Feel free to freeze the jam too, and that will last 8-12 months in the freezer
- Makes 5 Pints
Serve with cheese, on grain-free muffins, ice cream, yogurt or with granola.
 Dr. Meghan is the founder and creator of Just Enjoy Food, a resource and recipe blog created to support a healthier lifestyle. She believes every individual has the opportunity to live their healthiest life possible, which can be achieved through natural approaches. She overcame her own health challenges and throughout the process has gained valuable education in how our bodies work and heal. You can find her on Facebook, Twitter and Instagram and on her blog www.justenjoyfood.com


Yum! This looks fantastic!